
TL;DR
Moving your AI rig into a closet can drastically cut noise if you focus on placement and proper dampening. Foam alone won’t cut it—prioritize sealing gaps, treating hard surfaces, and ensuring ventilation for safe, quiet operation.
Ever wonder why some closet setups sound so much better than a desk rig? It’s not just luck. The secret lies in where you place your gear and how you treat the space around it. You can learn more about acoustic dampening and placement for your setup. Foam panels and blankets help, but the real magic comes from strategic placement and understanding how sound behaves in small, enclosed areas.
If you’re tired of noisy workstations and want a practical, no-fuss solution, this guide will show you how to turn your closet into a quiet, efficient workspace — without sacrificing performance or safety.
Acoustic dampening
& the rig in the closet.
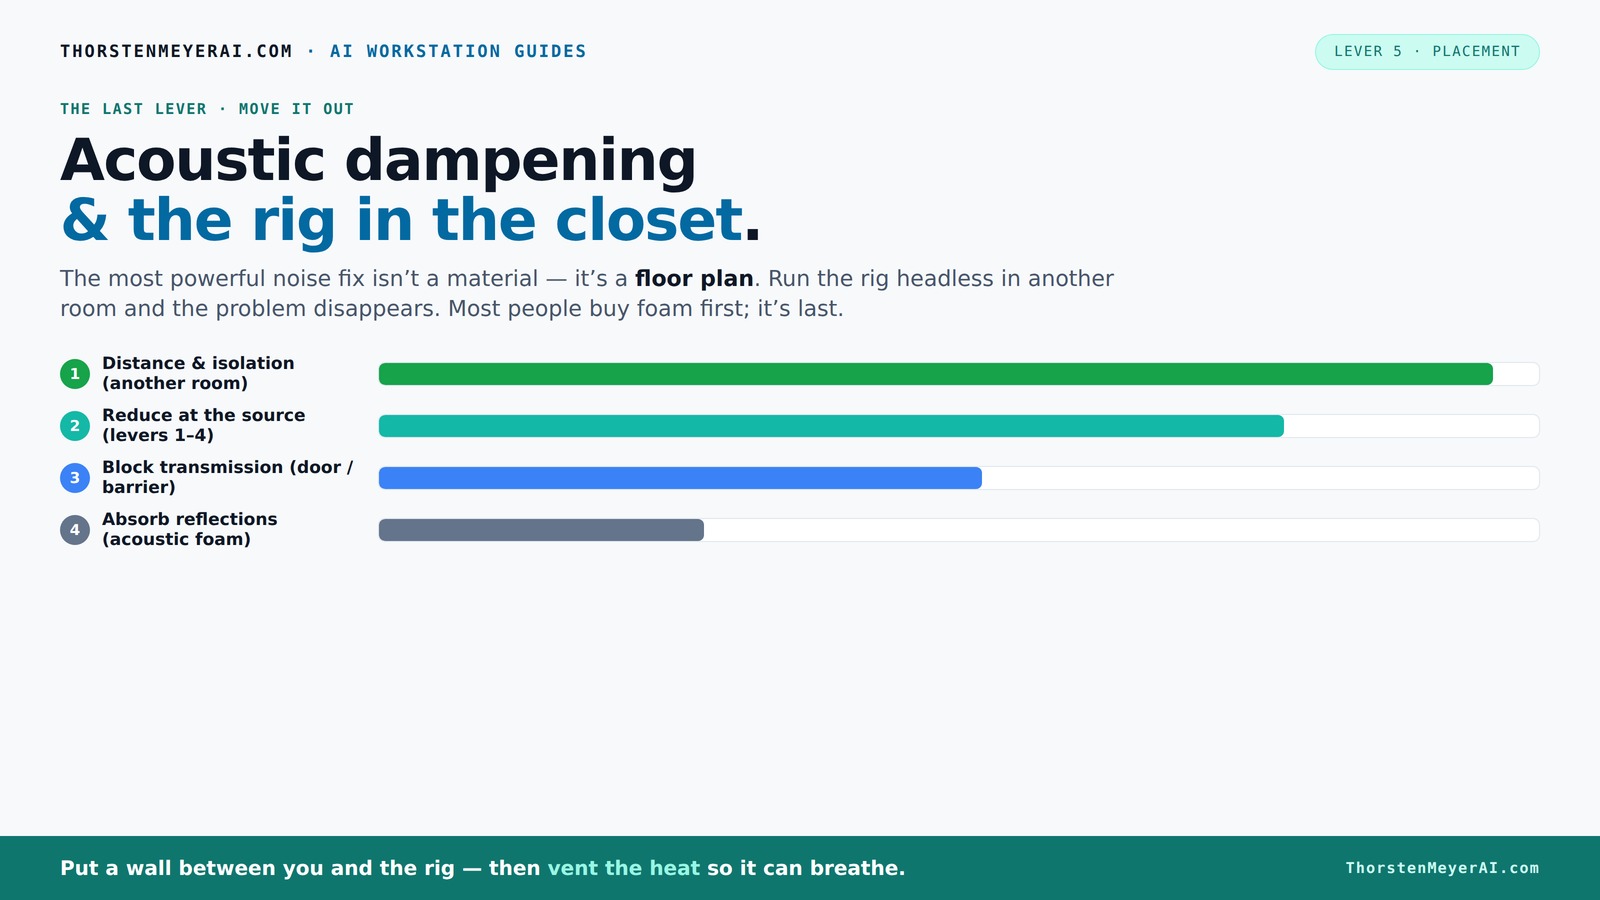
The most powerful noise fix isn’t a material — it’s a floor plan. A rig you can’t hear because it’s in another room beats any amount of foam. Tap the approaches in Part 1 to see what actually works.
(another room)
(levers 1–4)
(door / barrier)
(acoustic foam)
Contain the noise, not the heat
Key Takeaways
- Moving your rig into a different room is the most effective noise control method, especially for high-power workstations.
- Proper ventilation is essential — don’t trap heat in a sealed closet, or your hardware will throttle and roar louder.
- Placement of acoustic treatment matters more than just lining every surface; target reflection points and treat hard surfaces nearby.
- Sealing gaps around doors, outlets, and seams drastically reduces sound leakage, making your setup much quieter.
- Use a combination of materials: foam for mid/high frequencies, blankets for general dampening, and bass traps for low-end control.

4 Pack Sound Proof Foam Panels 48x24x2 Acoustic Foam Panels Egg Crate Foam for Walls Soundproof Studio Noise Thermal Insulation Soundproofing Waterproof with Adhesive Stickers
- Sound Absorption: High-density foam for echo reduction
- Premium Material: Uniform, professional-grade acoustic foam
- Noise Reduction: Controls reverberation and unwanted sounds
As an affiliate, we earn on qualifying purchases.
As an affiliate, we earn on qualifying purchases.
Why Moving Your Rig Is the Single Best Noise Solution
The loudest noise from your AI workstation isn’t just the fans — it’s the sound traveling through the air and bouncing off surfaces. Moving the entire rig into another room, like a closet, cuts noise by more than half. You don’t need fancy foam or expensive soundproofing — just a door and some ventilation.
Imagine working at your desk, chatting with a client, while your noisy GPU sits comfortably in a closet on the other side of the house. The sound is gone from your workspace. According to experts, distance and isolation are the most effective ways to quiet your setup without fuss.

HomeProtect Door Draft Stopper 36 Inch Under Door Draft Blocker Door Sweep for Bottom of Door Reduce Cold Air, Soundproof, Light, Odor, Weather Stripping Door Seal Strip Fit for Interior/Exterior
- Cost-effective Draft Stopper: Affordable single-side door draft blocker
- Easy Installation: Simple to measure, cut, and stick
- Fits Doors Up to 36 Inches: Suitable for doors with gaps under 1.5 inches
As an affiliate, we earn on qualifying purchases.
As an affiliate, we earn on qualifying purchases.
The 'Rig in the Closet' Setup: How to Make It Work Without Cooking Your Hardware
Putting a powerful, heat-generating machine in a closet sounds risky — and it is if you don’t plan carefully. The key is to make sure the space breathes. Use vents, passive airflow, or a quiet exhaust fan to keep hot air moving out. Without proper ventilation, your rig will overheat, throttle, and roar even louder. For tips on cooling and noise reduction, check out this comprehensive guide on cooling and noise.
One DIY enthusiast installed a small, quiet exhaust fan with a thermostat, maintaining a stable temperature while keeping noise low. The trick? Balance airflow with soundproofing. For more details, check out this [comprehensive guide on cooling and noise](https://thorstenmeyerai.com/reduce-heat-noise-ai-workstation/).

Windigaga 10 Inch Shutter Exhaust Fan, 890 CFM High-Speed Wall Mounted Exhaust Fan, 45dB Quiet Cooling Ventilation Attic Fan for Shed, Garage, Greenhouse, Basement, Chicken Coop, Generator Room, Black
- Size: 10-inch exhaust fan for efficient airflow
- High Airflow: 890 CFM for rapid ventilation
- Quiet Operation: Below 45 dB noise level
As an affiliate, we earn on qualifying purchases.
As an affiliate, we earn on qualifying purchases.
Acoustic Dampening in Tiny Spaces: What Works and What Doesn’t
In a small closet, reflections and standing waves can make your recordings or work sound harsh or boomy. Acoustic treatment isn’t just about foam; it’s about strategic placement of absorbers where sound bounces most. Soft materials like blankets, rugs, foam panels, and even clothing help soak up echoes.
For example, hanging a thick blanket over the door and lining the walls with foam panels or cloth-covered boards reduces slap echoes. But beware: foam alone often won’t block low-frequency noise or standing waves. Proper placement is crucial.
Understanding why this matters is key: reflections and standing waves can cause a buildup of certain frequencies, leading to muddiness or harshness in sound. Proper treatment ensures clarity, which is vital for accurate work or recordings. It’s a tradeoff—more treatment improves sound but can reduce space or accessibility. Knowing where to place absorbers maximizes effectiveness without cluttering the small area.

MINISFORUM AI X1 Mini PC, AMD Ryzen AI 9 HX 470, (12C/24T, up to 5,2 GHz,86 Tops), Radeon 890M, 2 x USB4, OCuLink, Quad 4K Output, Wi-Fi 7, 2.5GbE(NO RAM/SSD/OS)
- AI-Accelerated Processor: Up to 86 TOPS AI performance
- Powerful Ryzen AI 9 HX: 12 cores, 24 threads, up to 5.2 GHz
- Workstation Graphics Support: Radeon 890M and external GPU expansion
As an affiliate, we earn on qualifying purchases.
As an affiliate, we earn on qualifying purchases.
Placement Priorities: Where to Put Your Absorbers, Seal Gaps, and Treat Surfaces
Start with the mic position. Decide where you'll record or speak from before adding treatment. The main reflection points — the wall directly behind the mic and the wall facing it — should get priority for absorption. Use handheld, movable panels or blankets for flexibility.
Next, seal gaps around the door with weatherstripping or acoustic sealant. Cover hard surfaces like desks or shelves with fabric or foam to prevent reflections. Treat corners with bass traps to tame low-end buildup, especially in tiny, parallel-walled closets.
Understanding the importance of these steps helps prevent sound leaks and unwanted echoes. Proper placement of absorbers at reflection points can drastically improve clarity, while sealing gaps minimizes sound escaping or entering. To learn more about acoustic treatment strategies, visit this detailed guide on acoustic dampening. Treating corners with bass traps manages low-frequency issues that are common in small, enclosed spaces. The tradeoff involves balancing the effort of treatment with the improvements in sound quality—over-treating can reduce space, but under-treating leaves reflections and leaks that compromise audio clarity.
Materials That Make a Difference — Foam, Blankets, and Sealants Compared
| Material | Use | Pros | Cons |
|---|---|---|---|
| Acoustic foam | Absorbing mid/high frequencies | Lightweight, easy to install | Doesn’t block low frequencies, can be expensive |
| Blankets & moving pads | General absorption & sealing gaps | Cheap, flexible | Less durable, less precise |
| Rugs & carpets | Floor reflections | Reduces foot noise & echoes | Limited absorption capacity |
| Sealants & weatherstripping | Sealing gaps around doors & outlets | Cost-effective, simple | Requires careful application |
Choosing the right materials involves understanding their specific roles and limitations. For more insights on acoustic materials, see My Brutal Review for honest product reviews. Foam panels are great for mid and high frequencies but struggle with bass — so in small spaces, supplementing with bass traps or dense blankets can help address low-end issues. Sealants and weatherstripping are critical for preventing sound leaks, which can negate the benefits of acoustic treatment. The tradeoff here is cost versus effectiveness: investing in quality materials pays off in clearer, quieter sound. Learn more about effective acoustic solutions at PPM Equity. Combining these materials thoughtfully ensures comprehensive treatment tailored to your space’s unique acoustic profile.
Your Action Plan: The 4-Step Process to Quiet Your Closet Rig
- Seal all gaps: Use weatherstripping or acoustic sealant around doors, outlets, and seams.
- Block hard surfaces: Cover desks, shelves, and walls with blankets, foam, or fabric to reduce reflections.
- Install absorption: Place foam panels at reflection points and in corners for bass control.
- Ensure ventilation: Add a quiet exhaust fan or passive vents to keep heat and noise manageable.
Common Mistakes That Kill Your Closet Setup’s Effectiveness
Many DIYers treat only the corners with bass traps, thinking it’s enough. But ignoring the door gaps, hard surfaces, or mic placement often keeps reflections alive. Relying solely on thin foam or blankets without sealing gaps makes your efforts pointless. And placing the mic before planning the room’s treatment layout can lead to poor sound quality.
Another mistake? Not monitoring temperature. A closet rig that overheats will throttle performance and create more noise. Always check your ventilation and consider active cooling options. Overlooking these details can lead to a false sense of security, thinking your treatment is enough when in fact, sound leaks or heat buildup negate the benefits. Proper planning, sealing, and ventilation are essential to ensure your setup remains effective and safe in the long run.
Frequently Asked Questions
Is acoustic foam enough for a closet booth?
Not quite. Foam absorbs mid and high frequencies but doesn’t block low-end rumble or prevent sound from leaking through gaps. Combine foam with sealing and strategic placement for best results.Where should I place acoustic panels or blankets?
Target reflection points — the wall directly behind the mic and the opposite wall. Also treat corners with bass traps if low-frequency buildup occurs. Cover hard surfaces like desks and shelves to prevent echoes.Should I treat the walls, corners, or door first?
Start with sealing gaps around the door, then treat reflection points on walls, followed by corners for bass trapping. Prioritize based on your specific space and sound issues.How thick should the treatment be for a small closet?
Aim for at least 2-4 inches of foam or absorption material on walls and panels. Thicker panels improve absorption, especially for lower frequencies. Use bass traps in corners for best low-end control.Do I need bass traps in a closet?
Yes. In small, enclosed spaces, low frequencies tend to build up in corners. Bass traps help tame these, preventing boomy, muddy sound and improving clarity.Conclusion
Placing your AI rig in a closet isn’t just about hiding noise — it’s about smart placement, sealing, and airflow. When done right, it transforms a loud, chaotic space into a quiet, productive one. Your workspace no longer needs to be a sound echo chamber.
Remember: noise reduction is a game of strategy, not just materials. Focus on where the sound goes, how to block or absorb it, and keep your hardware cool. That’s the real secret to a silent, efficient workstation.