
To upgrade your DIY chip reader for EMV payments, you need to carefully modify your hardware by correctly removing, handling, and reinstalling microchips with proper orientation, using photos as a guide. Update your software tools to support chip data encoding, and connect your reader to microcontroller boards like Arduino for testing. Ensuring security and compliance is key, so follow best practices for encryption and tokenization. Continue exploring to learn detailed steps and safety tips for a successful upgrade.
Key Takeaways
- Acquire an Omnikey or compatible EMV chip reader and connect it to your computer via USB.
- Install and configure appropriate software like MSRX, Jcop English, or ATR Tool for chip data management.
- Carefully remove, document, and reposition the chip during hardware modifications to ensure proper orientation.
- Use encoding software to write valid EMV data and create hybrid cards with secure tokenization.
- Follow security protocols and industry standards to ensure EMV compliance and prevent card fraud during setup.

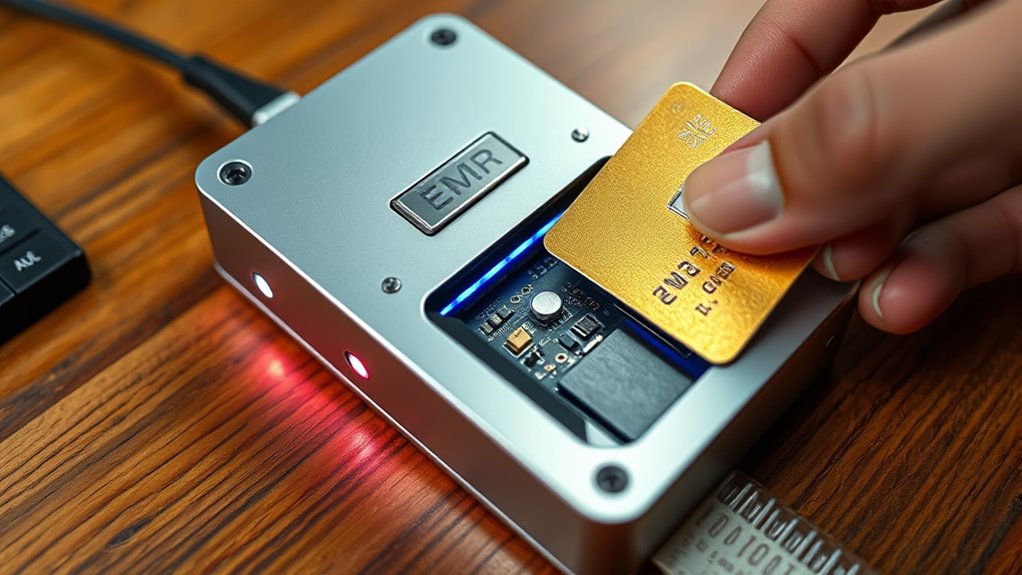
Creating your own DIY chip reader can be a rewarding project that enhances your understanding of EMV technology and payment security. With the right equipment and know-how, you can upgrade standard cards to support EMV chip transactions, giving you insight into how modern payment systems operate. The essential equipment includes an Omnikey reader, which is recommended for writing data to blank chips. To read and write magnetic stripe information, you’ll need a magnetic stripe card reader such as the MSR605x. Make sure you have blank cards compatible with chips, like J2a040 or unfused types, to serve as your test subjects. You’ll also want software tools like MSRX, ARQC Gen, Cardpeek, X2a, Jcop English, and ATR Tool 2.0 to encode, analyze, and verify data on your cards. A computer or laptop is necessary to run these programs and connect your reading and writing devices. Understanding chip technology is essential; EMV cards store data in a microchip that generates unique tokens for each transaction, considerably improving security. Correctly orienting the chip during removal and reinstallation is critical because the chip’s asymmetrical design requires precise placement. Before removing the chip, document its orientation with photographs to ensure proper reattachment later. When encoding data, remember that magnetic stripe information includes Track 1 and Track 2 formats, with data such as account numbers, cardholder names, and expiration dates. Proper encoding of both the magnetic stripe and chip data creates a hybrid card capable of functioning across different terminals. Tokenization plays an important role here, replacing static data with single-use cryptograms, which prevents fraud. Understanding the importance of secure data handling hardware modification is often the most challenging step. Carefully removing the chip without causing damage takes patience and precision. Once removed, the chip must be transplanted with exact orientation, using your photographic documentation as a guide. Laser engraving can be used afterward to customize the card surface if desired. To test your setup, connect a Magtek or similar reader to microcontrollers like Arduino, which allows you to verify the data read from both the mag-stripe and chip. Proper wiring and serial communication setup are essential to guarantee smooth operation between your hardware and development platform. Software plays a key role in programming and validating your cards. MSRX enables you to write data, while Cardpeek and ARQC Gen help analyze and generate cryptograms needed for EMV validation. Inputting accurate data formats is critical for encoding blank cards successfully. These tools also allow you to erase, read, and rewrite card data, which helps verify your work. Open-source scripts and custom programs can interface with Arduino or PC-connected readers to streamline the process. Security and compliance are important considerations. EMV chips protect against fraud by generating unique transaction codes, but maintaining exact chip orientation and data integrity during upgrades is essential to meet industry standards. Tokenization enhances security by making transmitted data non-reusable, reducing the risk of cloning or hacking. Using industry-standard unfused blank cards helps guarantee compatibility with merchant terminals. Without proper encryption and authentication, however, your DIY chips could be vulnerable, so proceed with caution and always prioritize security.
Frequently Asked Questions
What Are the Legal Requirements for Handling EMV Chip Data?
You need to follow industry standards for handling EMV chip data. This means encrypting transaction information, preventing data reuse, and securing data according to PCI DSS requirements. You shouldn’t store sensitive authentication data after transactions, and should use tokenization or encryption if data must be retained. Proper handling protects you from fraud liability, chargebacks, and potential legal issues, ensuring compliance with industry rules and reducing your financial risks.
How Do I Ensure PCI Compliance With My DIY Reader?
You want to make sure your DIY reader is a beacon of trust, so ensuring PCI compliance is key. Follow industry standards by securing your network with firewalls, changing default passwords, and encrypting data during transmission. Use approved hardware, support contactless payments, and regularly monitor your system. Keeping detailed logs, updating software, and limiting physical access help build confidence, transforming your setup into a safe space for every customer transaction.
Can I Integrate Contactless Payment Capabilities Into My DIY Setup?
You can definitely add contactless payment capabilities to your DIY setup. Start by choosing compatible ISO 14443 NFC modules and designing a reliable antenna. Guarantee your hardware supports secure encryption and complies with EMV standards, possibly by using certified SDKs or APIs. Connect the reader to your POS system via Bluetooth or USB, and verify it supports NFC transaction protocols. Remember, integrating with secure payment processing systems is key for safe, functional contactless payments.
What Security Features Should I Include in a DIY Chip Reader?
You might think securing a DIY chip reader is too complex, but it’s essential. You should include cryptographic security with dynamic transaction codes to prevent fraud, tamper-resistant hardware to stop physical attacks, and multi-factor authentication like PIN verification. Guarantee communication is encrypted, and follow PCI DSS standards for data handling. These features protect card data, prevent cloning, and keep transactions safe, making your setup trustworthy and compliant.
How Do I Troubleshoot Common Issues With EMV Chip Card Transactions?
When troubleshooting EMV chip card transaction issues, start by verifying card and terminal compatibility, ensuring the chip and PIN are enabled, and checking for hardware damage or dirt on the reader. Confirm stable network connections, review transaction logs for errors, and update your terminal firmware regularly. Power cycle the device if needed, and test with multiple cards to identify if the problem lies with the card, hardware, or software.
Conclusion
Now that you’ve upgraded your DIY chip reader, you’re truly transforming your payment system into a powerhouse—faster than a lightning bolt and more reliable than the sunrise. With your newfound skills, you can confidently accept EMV chip card payments and stay ahead of the curve. Remember, this upgrade isn’t just a small tweak; it’s like giving your business a rocket boost into the future. Keep experimenting, and watch your tech prowess soar beyond the stars!